


Showing posts with label Techniques. Show all posts
Showing posts with label Techniques. Show all posts
Wednesday, April 15, 2015
WHAT TO DO WITH YOUR SPONGE DAUBERS!
Here is a quick and easy video on how to use your Sponge Daubers. It also uses a stencil, and is awesome. PLUS, it is less than a minute long. ENJOY!
Friday, February 20, 2015
BOKEH TECHNIQUE!


Last week one of my customers and friends sent me a link to a video showcasing the Bokeh (pronounced boquet) technique. I have seen samples with this technique all over, but it looked extremely difficult, so I never got around to investigating how to do it. Well, the video made it look extremely easy, so "That Michelle" and I gave it a shot. It was very easy and very fun. I can't wait to try it using some different shapes. Maybe stars or hearts???
Friday, February 13, 2015
SHELTERING TREE FROM OCCASIONS CATALOG!

1) Stamp your image
2) Color areas you want to stay white (in this case those areas I wanted to look like snow on the branches) with a regular white crayon
3) Stamp and/or sponge color right over the crayon!
VOILA~~BEAUTIFUL!
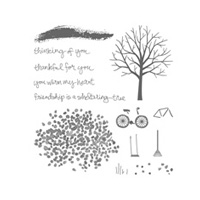
As you can see, this stamp set is not only perfect for this technique, but you can use it to make a card/gift for any season or occasion!
ORDER YOUR SHELTERING TREE STAMP SET HERE!
Monday, February 2, 2015
BUTTERFLY BASICS BUNDLE IS MY CREATIVE BLOG HOP PICK OF THE DAY!
Here it is, my very first blog hop. This is the Creative Blog Hop, and it is very simple. I post pictures of some things I have been working on, answer four questions and ask two of my friends to participate in the Creative Blog Hop next Monday.
Thanks for stopping by today. If you enjoy the Creative Blog Hop, please feel free to pass the link along to your friends so they can enjoy it too!
In light of the thirteen inches of snow that fell in Rochester Hills, Michigan during the day yesterday and overnight last night, I decided I would use the Butterfly Basics Stamp Set, along with the coordinating Butterflies Thinlits Dies AND the Artisan Embellishment Kit. I love the embellishment kit almost as much as I love this stamp set. I picked this stamp set, because I can't see a butterfly without thinking of summer and beautiful flowers and sunshine. I hope these cards will put a little sunshine into your Monday morning wherever you may be!
For this first card, I used some Blackberry Bliss and Sahara Sand ink and card stock. I love this 3x4 card with the die cut flowers. It is so elegant! I also added a little Blackberry Bliss Thin Velvet Trim around the middle of the lacy butterfly~~very beautiful!

This second card I spotted on Pinterest and it was way too tempting not to CASE. With the little Blushing Bride Rosette Trim and the Pearl Jewels and Doilie, this card is very soft and warm.

This stamp set lends itself to a collage look, so for the third card, that is what I did. The Rose Red Lace has an antique feel to it while adding lots of color to the card.

I used the coordinating Butterflies Thinlits Die on all of my cards. I think they are absolutely amazing with all the details in them, and there is no fussy cutting.... There is a trick to cutting the bigger butterflies out, and the trick is in the sandwich. Each Big Shot is a little different, but the sandwich that works best for me is (from the bottom up):
1) Magnetic base
2) Clear plastic plate
3) Dryer sheet (unused)
4) Card Stock
5) Wax Paper
6) Thinlit
7) Clear plastic plate
This sandwich makes my butterflies just pop right out~~no struggling and no "chads"!
I have one more card to share with you. For this one I used a really different technique. I stamped the background with the Gorgeous Grunge Stamp Set in Blackberry Bliss and then I spritzed my stamped cardstock with a spray bottle containing rubbing alcohol. That gives my background this sort of runny, watercolor look.


The Butterfly Basics Stamp Set and Butterflies Thinlits Dies are one of those great items Stampin' Up! offers "bundled" where you can save some money when you order the coordinating pieces~~I love saving money!!
You can order just the Butterfly Basics Stamp Set (shown below)

Or order just the framelits (shown below)
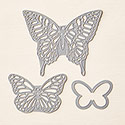
Or, you can bundle these products and get both the stamp set AND the framelits (shown below) and save 15%
And, of course, you are going to need this wonderful Artisan Embellishment Kit!

AND if you order all three of these items during Sale-a-Bration, you can pick a FREE item from the SAB Catalog!
YOU CAN PLACE YOUR ORDER RIGHT NOW, RIGHT HERE!
OKAY, back to the Creative Blog Hop. Here are the four questions, and my answers:
1) What are you working on now? The first Friday of each month I have a stamp club, so right now I am working on cards for them to make at club. Not to give too much away, but they will be using stamps from the Occasions Catalog AND the Sale-a-Bration Catalog
2) How does your work differ from others in your genre? When I am creating I always try to put a personal touch in everything I make. I combine different techniques to achieve just the right "feel" for all of my paper crafting projects. I am a Gemini, which is the sign of the twins, and to me this shows itself a lot in my work. I can create a very soft, feminine piece and then a really bright and funny piece. It's like I have lots of different personalities and tastes when I am creating, as opposed to one specific "style" I gravitate to.
3) Why do you create what you do? This might be the easiest question of all. I create because it soothes my soul and helps keep me grounded. It is the therapy that lets me be me and express myself. As far as creating what I do, I use my creations as gifts, decorations, party favors.... my creations add that special hand made touch that lets you know I genuinely care~~they are like a warm hug.
4) How does your creative process work? I always start with a sketch or an idea from something I have seen online or in a catalog, etc... and I go from there. There is always something that "sparks", whether it is a stamp or a color combination or an accessory; it just sparks an idea and I go forth and create. I often end up with something totally different than what my first "vision" was, and that is perfectly good with me!
Now for the two people I asked to participate next week, on Monday, February 9th. DRUM ROLL, PLEASE..... They are Emma Fewkes and Keri Blake. Both of these women are very talented Stampin' Up! demonstrators whose work I admire. I hope you will join them next week when they are the Creative Blog Hop!
See Emma HERE
See Keri HERE
Thanks for stopping by today. If you enjoy the Creative Blog Hop, please feel free to pass the link along to your friends so they can enjoy it too!
In light of the thirteen inches of snow that fell in Rochester Hills, Michigan during the day yesterday and overnight last night, I decided I would use the Butterfly Basics Stamp Set, along with the coordinating Butterflies Thinlits Dies AND the Artisan Embellishment Kit. I love the embellishment kit almost as much as I love this stamp set. I picked this stamp set, because I can't see a butterfly without thinking of summer and beautiful flowers and sunshine. I hope these cards will put a little sunshine into your Monday morning wherever you may be!
For this first card, I used some Blackberry Bliss and Sahara Sand ink and card stock. I love this 3x4 card with the die cut flowers. It is so elegant! I also added a little Blackberry Bliss Thin Velvet Trim around the middle of the lacy butterfly~~very beautiful!
1) Magnetic base
2) Clear plastic plate
3) Dryer sheet (unused)
4) Card Stock
5) Wax Paper
6) Thinlit
7) Clear plastic plate
This sandwich makes my butterflies just pop right out~~no struggling and no "chads"!
I have one more card to share with you. For this one I used a really different technique. I stamped the background with the Gorgeous Grunge Stamp Set in Blackberry Bliss and then I spritzed my stamped cardstock with a spray bottle containing rubbing alcohol. That gives my background this sort of runny, watercolor look.
Here is a close up look at the butterfly. After I used the Thinlit to "cut" the butterfly from my Blackberry Bliss card stock, I smushed some Versamark over the butterfly and then sprinkled some Irridescent Ice Embossing Powder over it and heated/embossed it. I love all the sparkles on the butterfly!
You can order just the Butterfly Basics Stamp Set (shown below)
Or order just the framelits (shown below)
Or, you can bundle these products and get both the stamp set AND the framelits (shown below) and save 15%
And, of course, you are going to need this wonderful Artisan Embellishment Kit!
AND if you order all three of these items during Sale-a-Bration, you can pick a FREE item from the SAB Catalog!
YOU CAN PLACE YOUR ORDER RIGHT NOW, RIGHT HERE!
OKAY, back to the Creative Blog Hop. Here are the four questions, and my answers:
1) What are you working on now? The first Friday of each month I have a stamp club, so right now I am working on cards for them to make at club. Not to give too much away, but they will be using stamps from the Occasions Catalog AND the Sale-a-Bration Catalog
2) How does your work differ from others in your genre? When I am creating I always try to put a personal touch in everything I make. I combine different techniques to achieve just the right "feel" for all of my paper crafting projects. I am a Gemini, which is the sign of the twins, and to me this shows itself a lot in my work. I can create a very soft, feminine piece and then a really bright and funny piece. It's like I have lots of different personalities and tastes when I am creating, as opposed to one specific "style" I gravitate to.
3) Why do you create what you do? This might be the easiest question of all. I create because it soothes my soul and helps keep me grounded. It is the therapy that lets me be me and express myself. As far as creating what I do, I use my creations as gifts, decorations, party favors.... my creations add that special hand made touch that lets you know I genuinely care~~they are like a warm hug.
4) How does your creative process work? I always start with a sketch or an idea from something I have seen online or in a catalog, etc... and I go from there. There is always something that "sparks", whether it is a stamp or a color combination or an accessory; it just sparks an idea and I go forth and create. I often end up with something totally different than what my first "vision" was, and that is perfectly good with me!
Now for the two people I asked to participate next week, on Monday, February 9th. DRUM ROLL, PLEASE..... They are Emma Fewkes and Keri Blake. Both of these women are very talented Stampin' Up! demonstrators whose work I admire. I hope you will join them next week when they are the Creative Blog Hop!
See Emma HERE
See Keri HERE
Wednesday, December 4, 2013
MASKING TAPE TECHNIQUE!
A very cool new technique that two demos in our diva group did for us at our last shoebox swap.
The first one was done by Caroline, and she used a blocked technique.
 This one was done by "That Michelle", and she uses a more free-flowing technique with different lengths and widths of masking tape.
 I can't wait to try the masking tape technique with my groups when the new year rolls around.
Thanks Caroline and Michelle for sharing your creative talents with me. You are always such an inspiration!
The first one was done by Caroline, and she used a blocked technique.


Thanks Caroline and Michelle for sharing your creative talents with me. You are always such an inspiration!
Monday, November 4, 2013
ENDLESS WISHES WITH FAUX PATTINA!

This is another one of the cards we made at the Technique Tuesday last week using the Faux Pattina Technique. Our ink mixture for this card was Crumb Cake, Crisp Cantaloupe, Raspberry Ripple and Elegant Eggplant ink (makes you hungry, doesn't it?). The sentiment is from the Endless Wishes Photopolymer Stamp Set.
Thursday, October 31, 2013
Here is one of the cards from my Technique Tuesday class, where we had lots of fun playing with the Faux Pattina Technique.

 Print Friendly
I love the Faux Pattina look, and we had plenty of creative input trying different color combinations during the Rubber Room Technique Tuesday classes. We made this card using the Monstermaniacs and Happy Day stamp sets. I just think the Monstermaniacs are so stinkin' cute! For the ink colors we used Pool Party, Pistachio, Island Indigo, Night of Navy and embossed with Silver Encore Ink Pad and Silver Embossing Powder. We also used the Argyle Textured Embossing Folder.

Monstermaniacs Clear-Mount Stamp Set 134972
Price: $14.95

Happy Day Clear-Mount Stamp Set 130297
Price: $16.95
Happy Day Wood-Mount Stamp Set 130294
Price: $21.95

Argyle Textured Impressions Embossing Folder 127750
Price: $7.95
ORDER EVERYTHING YOU NEED TO MAKE THIS CARD HERE!

I love the Faux Pattina look, and we had plenty of creative input trying different color combinations during the Rubber Room Technique Tuesday classes. We made this card using the Monstermaniacs and Happy Day stamp sets. I just think the Monstermaniacs are so stinkin' cute! For the ink colors we used Pool Party, Pistachio, Island Indigo, Night of Navy and embossed with Silver Encore Ink Pad and Silver Embossing Powder. We also used the Argyle Textured Embossing Folder.
Monstermaniacs Clear-Mount Stamp Set 134972
Price: $14.95
Happy Day Clear-Mount Stamp Set 130297
Price: $16.95
Happy Day Wood-Mount Stamp Set 130294
Price: $21.95
Argyle Textured Impressions Embossing Folder 127750
Price: $7.95
ORDER EVERYTHING YOU NEED TO MAKE THIS CARD HERE!
Thursday, September 12, 2013
PRETTIER FAUX PATINA?
This is the same card I posted yesterday. When I did this card, though, I was a little less initimidated by this "new-to-me" technique than I was when with my first card (yesterday's post). I really think I like the darker background (faux patina piece) better. They are the same colors, but for this one I just sponged with a "heavier" hand.

Here is a little close-up shot of the faux patina. I hope you can see a bit more of the metallic gold embossing, which is what gives it the patina look.


Which one do you like better? Please leave me a comment and let me know if you like the light or the dark!

Here is a little close-up shot of the faux patina. I hope you can see a bit more of the metallic gold embossing, which is what gives it the patina look.
Which one do you like better? Please leave me a comment and let me know if you like the light or the dark!
Saturday, February 18, 2012
TOTALLY TOOLS WITH A FAUX METAL BACKGROUND!
The faux metal background is a quick and easy way to add lots of texture to your card and give it a unique look. AND it is so easy to do!

For this card I used the Totally Tools Stampin' Up! stamp set. I embossed my hammer on both Real Red card stock and some Brushed Silver card stock. Then I cut the images out and layered them on top of one another so the hammer had a silver head and a red handle.
For the Faux Metal Background, I cut a piece of Whisper White card stock to 5 1/4" x 4" and then I also cut a piece of tin foil (regular ole' tin foil) to approximately 5 3/4" x 4 1/2" and I glued the tin foil to my piece of Whisper White card stock and then flipped it over and folded the "excess" tin foil over the back of the card and glued it there also. Then I just took my piece of tin foil wrapped Whisper White card stock and put it inside my Houndstooth Embossing Folder for my Big Shot and ran it through the Big Shot. I told you it was easy!!
ORDER YOUR STAMPIN' UP! GOODIES HERE AND MAKE THIS CARD YOURSELF!
Wednesday, June 15, 2011
EMBOSS RESIST MEETS SUMMER SPLASH!
This is a card we will be making in my Wacky Wednesday Club tonight. This stamp set is so much fun to play with~~I love all the bold images!

For this card I used the Emboss Resist Technique, and I'm going to share that technique with you in today's Watch It Wednesday Video.
ENJOY THIS WEEK'S EDITION OF WATCH IT WEDNESDAY!
To make this card I used the Summer Splash stamp set available in the Stampin' Up! Summer Mini Catalog; Whisper White Craft Ink; White Stampin' Emboss Powder; Not Quite Navy Cardstock, Marina Mist Cardstock, Crumb Cake Cardstock; Big Shot; Square Lattice Embossing Folder for the Big Shot; Marina Mist Classic Ink, Crumb Cake Classic Ink; So Saffron, Marina Mist and Wild Wasabi Stampin' Write Markers.
CLICK HERE TO ORDER YOUR SUPPLIES TO MAKE THIS CARD!
Sunday, May 8, 2011
INQUIRING MINDS!!
For all of those who have emailed and asked about the embossing on this card, here is your answer!

I scored a line 1/2" up from the bottom of my card and again 1 1/2" up from the bottom of my card. Then I put the top part of my card into my Square Lattice Embossing Folder, only up to my score line at 1 1/2" and ran it through my Big Shot. I then put the bottom part of my card, up to my 1/2" score line into my Square Lattice Embossing Folder and then ran it through my Big Shot.
I am not always good with "written" directions, so this week on Watch It Wednesday in the Rubber Room, I will show you how I did it. It really is easy~~after all, you gotta love easy!
Tuesday, February 15, 2011
MORE FAUX SILK!
This is another faux silk technique that fellow demonstrator, Linda, shared with us at our last get together! Thanks so much for sharing your talents, Linda!


Sunday, February 6, 2011
JUST BELIEVE!
I am sure you have often heard me say that there are some awesome "perks" to being a Stampin' Up! Demonstrator; and there are! Two of my favorites are the monthly magazine demonstrators get that are full of creative techniques and tutorials and inspiration.... AND, of course, the group of demonstrators that I am honored enough to be able to spend time with each month.
Today, I am combining both of those perks and showing you a card that Linda made to share with all of us at our last demonstrator get together. For this card Linda used the Faux Silk Technique, which was highlighted in our January, 2011 Stampin' Success magazine. We had lots of fun with this technique, and I love her card!

Thanks so much, Linda, for sharing this with us!!
Wednesday, January 26, 2011
ANY SIZE FRAME WITH YOUR FRAMED TULIPS EMBOSSING FOLDER!
Welcome back to Watch It Wednesday in the Rubber Room. In today's video I will share with you a great little "tricky technique" on how to make the Framed Tulips Embossing Folder frame any size you want! I got this idea from Sharon Fields, another Stampin' Up! Demonstrator who shared it in a written tutorial, that I found fascinating and inspiring!
I hope you enjoyed the video and the "tricky technique"!
Be sure to stop by tomorrow, and I will share with you all the details on how I made this card, along with the Product Parade containing a list of all the great Stampin' Up! products I used to make it!

I hope you enjoyed the video and the "tricky technique"!
Be sure to stop by tomorrow, and I will share with you all the details on how I made this card, along with the Product Parade containing a list of all the great Stampin' Up! products I used to make it!

Wednesday, December 29, 2010
WATERCOLOR LOVELY AS A TREE SYMPATHY CARD!
I am actually out of town today, so I scheduled this post for you, as I hate to miss a Watch It Wednesday.
I got a new video camera for Christmas, and I have a few little "kinks" to work out with it still. So, I apologize that this video is a little blurry or grainy. I will get it all figured out and with any luck next week's video will be much better.
In this video I am sharing with you a Water Color Wonder Crayon technique with the Lovely as a Tree stamp set and the Thoughts and Prayers stamp set. I hope you enjoy it!
Have a great week and be sure to stop by the Rubber Room often to see what's going on.
Wednesday, November 10, 2010
WATCH IT WEDNESDAY TEALIGHT TUTORIAL!
As you requested and I promised, below is a tutorial on how to make tealights all festive for the holidays. I used a large tealight (or "mega" as the package says); but you can use this technique on any size tealight. The original set of tealights I made was with the Scenic Season stamp set. You can view them HERE. For today's video I will be using the Holiday Lineup stamp set, and here's a couple pictures of the finished product.


ENJOY THE VIDEO!
Now you know how easy this is to do, so I hope you are off to make a few of your own.
Have fun!
Be sure to stop by next week for WATCH IT WEDNESDAY!


ENJOY THE VIDEO!
Now you know how easy this is to do, so I hope you are off to make a few of your own.
Have fun!
Be sure to stop by next week for WATCH IT WEDNESDAY!
Subscribe to:
Posts
(
Atom
)


