Friday, April 30, 2010

NO STAMPING TODAY!

Sadly, I have no stamping to share with you today. It was absolutely gorgeous here in Michigan, so I spent the day working on my flowers and in my yard. It's the first time I've been able to get out this year, so I had lots of fun!

My purse party is in a few minutes, and I'm excited about that too.

I promise to be back tomorrow to begin some stamping inspiration for May and share lots of new techniques and samples with things from the Summer Mini Catalog!!

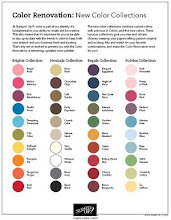
I had my Summer Mini Open House last night, and I think my customers really liked the goodies they got to use. Lots of excitement, too, with the new color samples. It's going to be a fun summer with all the new things coming from Stampin' Up! and I can't wait to get to share it with all of you!

Thursday, April 29, 2010

PRESTO PATTERNS PAPER AND ALL A FLUTTER!


Ready for this technique? It's a fairly easy one to do, and it uses lots of products from the Stampin' Up! Summer Mini Catalog, which you can order from beginning May 1st!

For this card I used the following items from the Summer Mini Catalog: All a Flutter stamp (item #118284); Presto Patterns Specialty Paper (item #117175); and the Gold Glow Smooch Spritz (item #118770). I also used Soft Suede Cardstock (item #115318), Vanilla cardstock (item # 101650), Earth Elements Watercolor Wonder Crayons (item #106696), Jet Black StazOn Ink Pad (#101406) and my Aqua Painter (item #103954).

The technique I used I call "Distressed Smooch". I started by shaking my Gold Glow Smooch Sprtiz really well, then I poured a little bit of the Smooch into a shallow dish (I used an empty brad/eyelet container). Dip a cotton ball into the Smooch and then "dab" it onto the Presto Patterns Specialty Paper. After "dabbing" the Smooch into several areas, I then "smoothed" the Smooch all over the Presto Patterns Paper. Now my paper has a very shimmery look and it is "darker" in the areas where it was "dabbed" first. Then to distress it, I sponged Soft Suede Ink onto the paper. You should sponge the Soft Suede Ink on while the Smooch is still wet. This will let you smooth the Soft Suede Ink onto the paper.

Stamp the All A Flutter stamp with Jet Black StazOn Ink and then use your Watercolor Wonder Crayons and your Aqua Painter to color your butterflies. I also sponged a little Soft Suede Ink onto the edges of the butterfly squares.

I added a little bit of Kraft Taffeta Ribbon (item #109068) to finish it off!

You are going to love all the new products in the Stampin' Up! Summer Mini Catalog. If you haven't gotten your mini catalog yet, please contact me. I will be happy to send one to you. AND when you're ready to place your order from the new Summer Mini Catalog, remember you can order 24/7 online HERE or contact me and I will place your order for you!

Tuesday, April 27, 2010

WOW!!!

Check it out, I have over twenty-seven thousand hits on my blog! This is just so amazing to me!

It seems like only yesterday when I was so excited to post this:
Wednesday, August 19, 2009 OH MY GOODNESS!!

WOW! I was so shocked to realize that this morning I had reached 16,000 hits on my blog. I cannot believe how many people stop by to see what's going on in the Rubber Room on the web. I hope that in some way each of you has been inspired by what's happening here.

THANKS EVERYONE!


In only eight short months another 11,000 people have visited the Rubber Room! I want to say a big huge thank you to everyone who subscribes to and visits my blog. I hope you will continue to visit and that you will find lots of inspiration here!

THANK YOU!!!

WAS YOUR GUESS RIGHT?


I am back to give you the directions for this card. Did you guess the item from my kitchen was wax paper? If you did, you were right!!

I took an ordinary piece of wax paper and smeared my Rich Razzleberry ink pad over it. Then I spritzed it with some shimmer mist. You want to get the wax paper really wet so you can see the ink "bead" up. When the ink starts to "bead" just set your piece of Presto Patterns Paper on it and press the paper down. You will see a soft, sort of muted color. One gal when I demonstrated it over the weekend said it looked like it was "flocked", which I think is a great way to describe it!

More Presto Patterns Paper samples to come this week, so be sure to stop back by!

Sunday, April 25, 2010

PRESTO PATTERNS PAPER AND WATERCOLOR WONDER CRAYONS!


This is another card that I demonstrated at Ronda Wade's Spring Fling yesterday. I had a great time with this paper and am anxious to share it in classes and clubs next month!

For this card I used my Stampin' Up! Watercolor Wonder Crayons. I "scribbled" my crayons lightly over my Presto Patterns Paper and then used my Aqua Painter to blend all the colors together. Then I colored my stamp with my Watercolor Wonder Crayons and sponged water lightly onto the stamp and then stamped the image right onto my Presto Patterns Paper.

I will be sharing a lots of Presto Patterns Paper ideas with you in the next few days, so be sure to stop back by!

Saturday, April 24, 2010

PRESTO PATTERNS SPECIALTY PAPER!


Here is one more sneak peek to tease you with. I am probably at the Spring Fling right now demonstrating this technique. I will share with you next week all the techniques I'm demonstrating, so get ready to fall in love with this paper! I am having so much fun, I'm considering giving this paper its very own class!!

Friday, April 23, 2010

PRESTO PATTERNS PAPER SNEAK PEEK!


Well, tomorrow I am off to Morrice, Michigan to participate in Ronda Wade's Spring Fling. I'm going with a few other demonstrators from and they have become my support group! Ronda asked me if I would demonstrate a new product from the Summer Mini Catalog, and I agreed, and tomorrow is the big day!

I will be demonstrating the Presto Patterns Specialty Paper available on May 1st, 2010 in the Summer Mini Catalog. This is definitely a MUST HAVE! After playing with it, I think it is so awesome, and I've even found it more fun than a few stamp sets I own.

Okay, I am not going to share with you my "recipe" for how I made the above card because I want the demonstrators to be really WOWed at our get together tomorrow. Here is a little hint, though, I used something from my kitchen ;o) BUT I will share all the directions with you next week.

AND I will tease you with another sneak peek of what I'm demonstrating tomorrow. Please come back and check it out tomorrow and then you'll have to come back next week for all the details on the techniques!

Thursday, April 22, 2010

MOM'S SHADOWBOX!


When my grandfather passed away in July, my sister became the "keeper" of my mom's first baby shoe and her birth announcement. I put them into a shadow box and added a few of those beautiful punched roses. It was hard to take a good photo, but I think you can get the idea. I think this will be her Mother's Day gift!

Wednesday, April 21, 2010

TIME IS RUNNING OUT!


April 30th will soon be here, so don't be left out in the cold! After April 30th, the items in the Stampin' Up! Occasions Mini Catalog will no longer be available. If you have something in that little catalog (which is packed full of stamp sets, punches, designer series paper, tons of accessories and so much more) you need to order now!

You can place an online order 24/7 HERE
OR Call me at 248-652-4606
OR Email me at ckolly@stampingismybusiness.

Order however it is convenient for you, but don't forget to order!

Tuesday, April 20, 2010

AWASH WITH FLOWERS GABLE BOX!


This is my latest project from Keri's class. The stamp we used for the six cards and the gable box was Awash With Flowers. It is a very cool two-step stamp set, and it is FREE until the end of April with any qualifying minimum $350 hostess party! Contact me today to schedule your workshop before the end of the month, and get this great stamp set for FREE!

The pattern for this box and the cards came from Ilina Crouse, and Keri was a great teacher. I think I have two or three more classes with her, and I am so looking forward to it!

Monday, April 19, 2010

INSPIRED BY NATURE GIFT SET!


This is the first part of the Inspired By Nature Gift Set class taught by the very talented Keri Blake. There is another box that goes to the "Gift Set", but we didn't quite get to that one during class.

This cool gable box has six cards that fit inside it with their envelopes. I think it is so nifty looking! This is one more of the projects we're making in Keri's classes, the pattern and directions for this class were purchased from Ilina Crouse.

Sunday, April 18, 2010

BUILD-A-BEAR NOTE BOXES!


Isn't this the neatest little box? I got this box pattern from Kim Score, and it holds a 5x5 card, or little notes. I actually cut notes from copy paper that were 4 3/4 x 4 3/4. Now, I am going to have to "redesign" my box so I can use my scraps from the copy paper I cut for this one. I'll be sure to show you what I come up with though.

The box has an 'easel type' opening, so I have photographed it open and closed. I closed it and wrapped a little ribbon around it so it would be ready for gift giving. The bear is made with my Build A Bear Die for my Big Shot. Kim's pattern showed me how to "enhance" my bear so it have a whole different looking face now.

Saturday, April 17, 2010

FLIGHT OF THE BUTTERFLY SUITCASE!


I am continuing my classes with Keri and having so much fun! This is a little suitcase we made that holds cards! We used the Flight of the Butterfly stamp set and a border punch to decorate our suitcase. You can see there are double pockets (each holding 4 cards with 4 envelopes) when you open the box.

This is another class that Keri purchased from Ilina Crouse, so I can't share the pattern. BUT, you can visit Ilina's blog HERE!

Friday, April 16, 2010

PRESTO PATTERNS PAPER MEETS ROSES!


I had to try Michelle's great roses, but I needed to work on my upcoming demonstration with the Presto Patterns Specialty Paper, so here's what I came up with! My dear friend, Lisa, came by to play, and I put her to work helping me "copy" Michelle's flowers.

For this frame we made roses with Pale Plum cardstock and Rich Razzleberry cardstock. I colored my Presto Patterns Paper with Pale Plum ink and the used some Mod Podge to attach it to my frame. This is definitely much prettier in real life!

Thursday, April 15, 2010

MICHELLE'S AMAZING FLOWERS!


If you are a regular RubberRoom Ramblings blog visitor, you have, no doubt, seen a lot of Michelle's beautiful creations. Michelle is part of my very talented downline, and she treats me to a lot of great techniques and ideas. She created these breathtaking flowers with her Extra Large Fancy Flower Punch (item #118073--available until April 30th in the Stampin' Up! Occasions Mini Catalog). Michelle's inspiration for this card came from Gretchen Barron, another talented Stampin' Up! Demonstrator.

AWESOME FLOWER FRAME!


Michelle used her beautiful punched roses to make this great frame for Mother's Day. What a lovely gift idea! I am so honored she likes sharing with me! You rock, Michelle!

Wednesday, April 14, 2010

I AM GOING OUT OF TOWN!

After hibernating all Winter, I am off to visit my family. Unlike me, they all headed somewhere warm to winter (some to Florida and some to Myrtle Beach) and, yes, they left me behind to enjoy the cool winter months in the Rubber Room. I am planning a weekend full of girl's fun time. In fact, my sister called earlier to tell me there was a new "spa" that just opened and we were definitely going. I will treat myself to a pedicure and a massage for sure! I have a feeling there may even be a "chick flick" on tap at some point. I will be home on Monday and will get back to work then!

Don't fret, however, because I wouldn't forget you gals that need a Rubber Room fix often. I will go right now and "schedule" some posts to keep you entertained while I'm away!

Have a great weekend and enjoy some stamping and relaxing.

FAUX PEARL FLAT-BACKED BEADS!


I came up with this really great card that I wanted to do for a swap for an upcoming Stampin' Up! event, but I needed these flat-backed pearl beads, and I simply did not have enough of them for my swap cards. SO, I decided I would try my hand at making some, and this is what I came up with. I was very pleased with the results!

For the faux beads I took an empty brad container and put a little mixture of 2/3 crystal effects (item #101055--available in the 2009-2010 Stampin' Up! Idea Book and Catalog) and 1/3 Frost White Shimmer Paint (item #116854--a "write in available to order now). I mixed them together really well with a popsicle stick. Then I sucked the mixture up into an eye dropper and dropped little circles of the mixture onto a sheet of wax paper. I let them dry overnight, then peeled the little faux beads off, added a mini glue dot (item #103683--in the 2009-2010 Stampin' Up! Idea Book and Catalog)to the back and attached them to my heart! They aren't even tacky, which I really like!

For the card I used my Stampin' Up! Scalloped Heart of Hearts Embosslits Die for my Big Shot (item #117332--available in the Occasions Mini Catalog until April 30th). I also used my Full Heart Stampin' Up! Punch (item #113693--in the 2009-2010 Stampin' Up! Idea Book and Catalog). I also used my Stampin' Up! Perfect Polka Dots Textured Impresions Folder for the Big Shot (item #117335--available in the Occasions Mini Catalog until April 30, 2010) to put all those nice little dots on my cardstock. The sentiment is from the Only Ovals stamp set (item #111666--in the current Stampin' Up! Idea Book and Catalog). I punched the sentiment out with my Wide Oval Punch (item #112082--in the current Stampin' Up! Idea Book and Catalog).

Where'd that awesome background paper come from?? Well, at the same event I'm swapping this card, I will also be doing a demonstration with the Presto Patterns Specialty Paper. If you aren't a Stampin' Up! Demonstrator, this will be a little sneak peek of what's come in the Stampin' Up! Summer Mini Catalog! If you were a demonstrator, you could be playing with it right now, just like I am! NEED to be a demonstrator, just contact me, and I'll be happy to share all the perks of being a demosntrator with you and help you to join my Stampin' Up! demonstrator family. Or you can go HERE, use the password RubberRoom and sign up to be a Stampin' Up! Demonstrator and start enjoying one of the greatest jobs you could ever imagine!

The Presto Patterns Specialty paper comes in white with embossed images on the pages. You get to pick what color you want to add and how you want to add it! I will be offering a class soon teaching my customers how wonderful this paper is and all the endless possibilities for bringing it to life!

This was a very fun card to make, and I'm hoping the gals I'm swapping with really enjoy it!

Monday, April 12, 2010

BRENDA'S BIRD HOUSES WITH THE BIRD PUNCH!


I absolutely love it when my customers share their creations! Brenda sent me this photo of several birdhouses she made with the Stampin' Up! Mini Milk Carton Bix L Die for the Big Shot. This die is available until April 30th in the Stampin' Up! Occasions Mini Catalog (Item #117310).

Brenda then made life-like birds with her Extra-Large Two-Step Bird Punch. This item is also available in the Stampin' Up! Occasions Mini Catalog until April 30th (Item #117191). I am not sure I have the patience to make such life-like birds, but these are definitely an inspiration!!

Thanks for sharing, Brenda!

Friday, April 9, 2010

TWO-DRAWER BOX CLASS!


My dear friend and fellow demonstrator, Keri, taught a class for this Two-Drawer Box, and I love how it turned out. Thanks, Keri, you were an awesome instructor!

The pattern for this box was purchased from Ilana Crouse, and it was used only in class, so I cannot provide anyone with the pattern, dimensions, etc.... as I do not have them. However, you can purchase a pattern for yourself at Ilana Crouse's blog HERE!

For my two-drawer box I used the brand new Island Oasis Designer Series Paper, which will be available to customers in the Stampin' Up! Summer Mini Catalog.

I decorated the top with the Sizzix Bigz Die called Beautiful Butterflies, which is available in the current Idea Book and Catalog from Stampin' Up! (Item #114507).

I also used some halfback cream pearls to decorate the front of my butterfly with. The halfback pearls are contained in the Pretties Kit (Item #109114) in the current Stampin' Up! Idea Book and Catalog. This is a totally awesome kit with so many great pieces in it! It has flowers in five different shapes and sizes that can all be colored with Pastels, Watercolor Wonder Crayons or Classic Ink. AND it has halfback pearls in both white and cream; round pearls in both cream and white, with holes in them; clear round beads that come with side holes and then some that come with center holes; clear teardrops; hat pins with clutches; spacer beads and clear round rhinestone brads. It's a great deal for only $29.95.

Use my Order button on my "nav bar" to go to my website and order 24/7. Want to get the Pretties Kit FREE? Contact me to schedule a workshop and use your Hostess Dollars to earn your Pretties Kit FREE!

Check out the post below for lots more photos of my Two-Drawer Box!

NEW ISLAND OASIS DESIGNER SERIES PAPER!


Here are lots of different "views" of the two-drawer box! You can see the front with the bow all tied up pretty; without the bow tied so you can see the drawers, the back all nice and smooth with Island Oasis Designer Series Paper; the sides where the drawers are "wrapped" in Designer Series Paper and, of course, open so you can see inside with bottom drawer pulled out!

Once again, big thanks to Keri for taking the time to teach this class to us! And, of course, to Ilana Crouse for providing Keri with the pattern. You can visit Ilana's blog HERE!

Hugs from the Rubber Room